Craftiosity supplies a bimonthly craft kit which includes everything you need to make something lovely and useful with your own two hands. Past boxes have had a huge variety of projects, including a clock, a mobile, needle felting, and lots more. It’s a great way to try out lots of different techniques, and have something lovely at the end of it!

This month’s kit is something I’ve never tried before, or indeed know anything about: papermaking!
Not just papermaking, but adding seeds to the paper to make seed paper. This is incredibly clever way to send the gift of growing plants to friends, or for that matter to keep to yourself.
Seed paper is exactly how it sounds, paper with seeds embedded in it so you can cut it, write on it, and then plant it in the ground to grow. It’s a beautiful and sustainable gift, or simply a fun project for yourself or children.
The kit provides everything you need:

You’ve got paper pulp, a frame, seeds, and even envelopes, so you can make little cards to send from your paper. There’s even a little bonus in the shape of a seed pod pencil: you use the pencil and at the end is a tiny pod full of seeds. You plant this in the ground and watch the seeds grow, and of course the pencil, being wooden, breaks down.
The instructions as always are extremely good.

There are step-by-step photographs with descriptions, and there is also access to an extremely comprehensive video if you would like to actually see the process in action.
Oh, and you also get some beautiful postcards to send.
The process of making the paper the paper isn’t complicated but it does have several stages which take some time. So this is a project you can do over two or three days, a little bit at a time. There’s also a certain amount of mess involved (only water really) so you need to have somewhere suitable such as a sink. But everyone has one of those!
The kit contains all the technical equipment you need, such as paper pulp, seeds, and frame, though you do have to gather a few extra items such as towels and bowls.

The process is actually very simple. You soak the paper pulp sheets for several hours (or overnight) and then break them up so you have this wet soft fluffy stuff. This is the base of the paper.
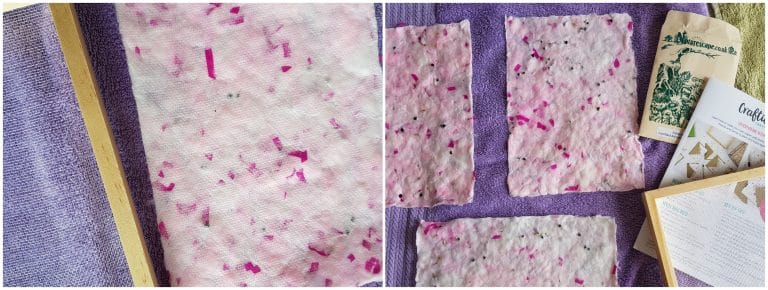
The instructions suggest using other bits of paper too, such as the pink shred that came as padding in the box, and I decided to do this to add some extra colour.
So you add that, mix it around, and then pour into the mesh frame and allow to drain a bit. See how lovely the pink shreds look?
After pressing down to push some of the water out you sprinkle over some of the seeds.

Then you add more pulp over the top, press down to drain again, and the carefully invert over a towel.

You need to press with a towel again to get as much water out as possible, then just repeat the process with the remaining pulp and seeds.
Then you leave to dry – it takes a while, and at the end of it you have lovely seed paper ready to use or gift as you like!

The kit give you enough to make three or four sheets of paper. I ended up making three sheets.
As you can see they’re not totally perfect, I made one end a bit think so it tore, but I don’t think it matters at all. I’m going to cut out shapes and send them to friends for their garden. I might even plant a couple myself!
While the time needed for all the stages was a couple of days, the actually making wasn’t hugely time-consuming.
I did use the video to properly understand how to spread out the pulp, and it was extremely useful to be able to watch and copy.


